Prepare SAP HANA server For SSL

The COMMONCRYPTOLIB and OPENSSL (If you are using self signed certificate) are required on the HANA server. This is normally already installed along with your HANA installation.

CommonCryptoLib (libsapcrypto.so) is installed by default as part of SAP HANA server installation at $DIR_EXECUTABLE.

direxe

Check OPENSSL.

openssl

Certificates stored in the file system are contained in database-specific personal security environments or PSEs (default $SECUDIR/sapsrv.pse).

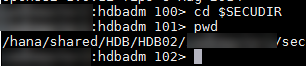
Navigate to $SECUDIR

secdir

This ensures all the prerequisites are met and all environment variables are properly set.

  1. Create the PSE and Server Certificate Requests Using SAPGENPSE
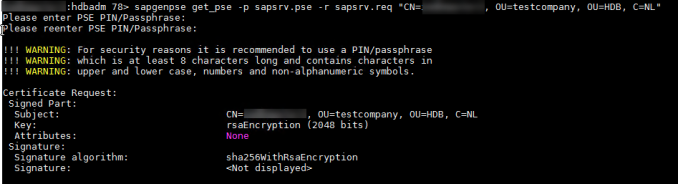
SAPGENPSE1Important Note:
    • Do not enter password when requested for PSE PIN/paraphrase as it is not supported!
    • Also, to secure internal communication, canonical name should be host specific, eg CN=”<hostname_with_domain>”. So when creating private CA on each host, parameter CN will be unique.


    This creates two files:

    TUT1

  2.  Create root the certificate for this hostsecstore2
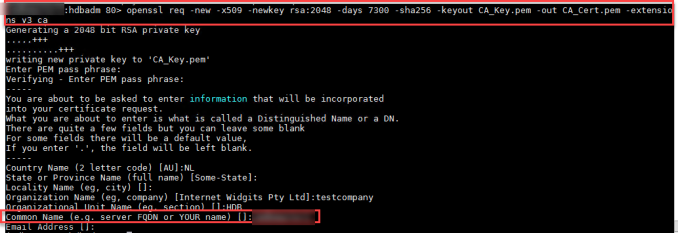
Here you can use the pass phrase that you want.
    You now have two more files in the directory:cakey
  3. Sign the certificate request.You can get the certificate signed by CA. But since this is just for demo, we will sign the certificate using openssl.ca23
    A new file with name sapsrv.pem will be created in the same directory, $SECURDIR
    cer1With this step you have the certificate ready that can be used on Client machines.
    In the next blog we will see how to use this certificate to login to HANA Database via HANA Studio using SSL.
  4. Import the server certificate into pse.impcertNote that the pse file has a new timestamp with certificate added.certadd


Import SAP Notes:

2487639 – HANA Basic How-To Series – HANA and SSL – MASTER KBA

2183363 – Configuration of SAP HANA internal network

2009483 – PSE Management in Web Administration Interface of SAP Web Dispatcher

2487698 – HANA Basic How-To Series – HANA and SSL – establishing a secured ODBC/JDBC connection using HANA Studio

2416525 – Single SSL Certificate with FQDN configuration for HANA Scaled out / MDC in HANA Studio


Starting Sybase ASE Database (Linux)

Make sure you are logged in with user syb<sid>.

From the environment variables find you Sybase ASE install Directory:

path

Travesrse to the install path:

change dir

Here you see the configuration files (Runserver) RUN_<SID> (Database server) and RUN_<SID>_BS (Backup server).

Use command startserver to start each server process.

You can either start them individually or together.

  • -f runserverfile – specifies the relative path name of a runserver file, which is used as a reference each time you start an SAP ASE server or Backup Server. By default, the runserver file is in the current directory and is named RUN_servername. If you start a second SAP ASE server on the same machine, startserver creates a new runserver file named RUN_servername.
  • -m – starts an SAP ASE server in single-user mode, allowing only one system administrator to log in, and turns the allow updates to system tables configuration parameter on. Use this mode to restore the master database. The system administrator can use thedbo use only parameter of sp_dboption for system administration activities that require more than one process, such as bulk copying or using the data dictionary. startserver normally starts up only one server per node.The -m parameter creates an m_RUNSERVER file and overwrites any existing m_RUNSERVER file.

start

After both the processes are started the control is not returned back until you hit a key.

end of start

Now you can check the status of server using command showserver.

showserver


2570084 – How to start Backup Server manually – SAP ASE

2307016 – How to manually configure and start ASE Cockpit for an existing ASE server – ASE 16.0 SP02 PL02

2581558 – Starting SAP ASE Backup Server as windows service reporting error “The service did not respond to the start or control request in a timely fashion”support-grace , support grace, Application version, License version, lic, Sysam, grace period, ASEServer, SAPASE, .lic, FLEXnet Licensing error, key, old license file, datestamp, support renewal date, sybase license , KBA , BC-SYB-ASE , Sybase ASE Database Platform (non Business Suite) , Problem

What exactly does “Program Not Registered Mean”?

Many times we come accross RFC connections of type TCP/IP connection which are not working or suddenly stop working with most infamous error “Program no registered”

Logon Connection Error
Error Details Error when opening an RFC connection
Error Details ERROR: program <program id> not registered
Error Details LOCATION: SAP-Gateway on host xxxxx / sapgwxx
Error Details DETAIL: TP xxxxx not registered
Error Details COMPONENT: SAP-Gateway

External program should always regsiter on the Gateway of the SAP application to be able to establish connectivity like SLD registers itself using RFC’s SLD_UC or SLD_NUC.

For example a ESB program like WSO2 should register on the gateway using connectors (.jar files normally). While registering, it will use details of the application/server like, gateway host, gateway service, Program ID, user name, password etc..

Once this program is registered you should be able to see this under the logged on clients in transaction SMGW:

You should see the program you registered under TP name. Once this is done, you are ready to create the required TCP/IP RFC using the same program ID under TP name.

smgw

smgw2

If you are not able to see this TP Name registered, check the connectivity from you third party server to SAP gateways host by doing a telnet to gateway port.

If this works, it could be your gateway ACL parameters are blocking the connection.

Check you profile parameters for gw/acl_mode, gw/sec_info and gw/reg_info etc and adjust them accordingly,

2104408 – Checklist for “program <program ID> not registered” errors


Adobe Document Services – A complete guide

Below steps explain Adobe Document Services (ADS) configuration for SAP:

ADS component runs on the Netweaver JAVA stack of SAP. So you can use, JAVA stack of Solution Manager, PO/PI, Enterprise Portal etc.. to connect to any ABAP stack application for generating PDF documents.

Install ADS on a SAP NW JAVA system:

ADS is by default not installed on the JAVA instance.  You must install it manually install the same if not already installed on your SAP JAVA engine. Ensure that you install the right version for you Netweaver stack.

Please refer to blog to install the component using telnet.

Install required libraries if running on Linux:

If your JAVA application is running on Linux, ensure that you have installed the required libraries as per below SAP Notes:

2029940 – IFbA: Required additional RPM package for ADS on Linux

1956394 – Troubleshooting for ADS OS native module termination on Unix platform

If this is not done, you might receive following errors when running FP_PDF_TEST_00.

“ADS: com.adobe.ProcessingException: com.adobe.Processin(200101)”.

And you might see following errors in the NWA logs:

ads1

ads2

Create users on JAVA:

Create user ADSUSER on JAVA engine with roles SAP_ADSCALLER and SAP_ADSMONITOR.

I suggest to make this a technical user.

Create users on ABAP:

Create user ADSAGENT and assign roles ADSCALLERS, SAP_BC_FPADS_ICF and SAP_BC_FP_ICF.

Activate the required services from SICF:

ads3

Create Destination for ABAP server with name FP_ICF_DATA_<SID> from NWA.

ads4

ads5

ads6

Create RFC from your ABAP to JAVA:

Path Prefix: /AdobeDocumentServices/Config?style=rpc

ads7

ads8

You are now done with the configuration of ADS

Test your ADS configuration:

Run report FP_TEST_00 (SE38/SA38):

ads10

ads11

ads12


Run report FP_PDF_TEST_00 (SE38/SA38):

ads1

ads2


Run report FP_CHECK_DESTINATION_SERVICES (SE38/SA38):

ads3

ads4

If you get errors in any of these tests recheck your configuration. Check if any user is locked.

Additional SAP Notes for ADS configuration and troubleshooting:

1780404 – ADS problem on Solaris 11

2226341 – How to activate ADS trace in NW 7.1 and higher? [Video]

1503408 – Central Note for ADS on NW730

2420614 – IFbA: Suppress ADS error message from FP_PDF_TEST_00

1675976 – Password pop-up in ADS

1462986 – ADS Load Balancing

2029940 – IFbA: Required additional RPM package for ADS on Linux

1177315 – ADS RFC destination test return 403 / 404 / 405 code

2366561 – ADS RFC destination path prefix returns warning “Query string not allowed”

2395126 – HTTP 407 error in ABAP HTTP connection to ADS [VIDEO]


R3trans and hdbuserstore

When you change the password of connecting user of SAP HANA database, same should be updated in the key file of the HDBUSERSTORE on the Application Server.

You should be logged in with <SIDADM> for this procedure.  Take care of this specially if you application server and database are running on same server.

#> hdbuserstore SET DEFAULT <hostname>:3<instance Number>15 <user> <password>

Note: User option -i along with the command if you want to enter the options (mainly password) interactively.

Example:

hdbuserstore SET DEFAULT hanahost:30015 SYSTEM Hana@123

Once updated check the list using the below command.

#> hdbuserstore list

DATA FILE : /home/appadm/.hdb/hanahost/SSFS_HDB.DAT
KEY FILE : /home/appadm/.hdb/hanahost/SSFS_HDB.KEY

KEY DEFAULT
ENV : HANAHOST:30015
USER: SYSTEM

You can now check the connectivity with the DATABASE using R3trans -d.

If R3trans -d reports error, check the connectivity with hdbsql using the key created above.

#> hdbsql -U <KEY>      #Key is “DEFAULT” in our example.

This should connect to the database without any issues.

You might receive error sql code  rcSQL = -10709 in case of connectivity issues. Please check the host name and port again in case of issues.

In case of any issues/questions please leave a comment below. Happy learning.


Important Notes:

2250144 – FAQ: SAP HANA Secure User Store

2563762 – hdbuserstore still using old hostname after updating

2399996 – How-To: Configuring automatic SAP HANA Cleanup with SAP HANACleaner

2653777 – Phyton connection to HANA database using hdbuserstore-key fails

2416706 – Check file permissions for SAP HANA client hdbuserstore on application server

2130496 – Application does not start after takeover-HANA Disaster Recovery


2709350 – How To set a HANA System License via HDBSQL


System Copy – Sybase ASE

It is one of the most simplest system copies i have ever done. Ensure that Source and Target databases are running on the same release.

No need to uninstall the application or perform a rename using SWPM

I have not mentioned the pre and post processing steps as they are common to all databases and it will differ from customer and customer based on their system usage.

Once you have completed the pre-processing , perform the below steps.

I will assume “TRG” as your target database and “SRC” as your source database.

  • Copy the latest full backup file and required transaction backup files to the target server
  • Stop SAP Application on the target server.
  • Login to SQL/ISQL using “sa” or “sapsa” user ID on target server.
  • Drop the target database using below command. This might take few minutes based on database size.

drop database TRG

  • Create database TRG using below command.

create database TRG on TRG_data_001=’398743M’ log on TRG_log_001=’20480M’ for load

Note:

  1. Size used above are depiction only. This should be equal to or more than your source device sizes.
  2. Replace the device names TRG_data_001 and TRG_log_001 with appropriate device names.
  • Now load the created database using the source backup using below command.

load database TRG from “D:\backup\SRC.dmp”

Note: Assuming “D:\backup\SRC.dmp”. This might take some time based on the source backup size.

  • Now load the log backups to perform point in time recovery using below commands.

load transaction TRG from “D:\logbackup\SRC_001.trn”

load transaction TRG from “D:\logbackup\SRC_002.trn”

etc…

  • Bring the restored database online.

Online database TRG.

Now you are all set to start SAP and perform post processing.


Note: Even though i have not mentioned pre and post steps here, do remember to make the rdisp/wp_no_btc to 0 in your profile parameter before starting SAP.


Important Notes:

2542361 – System copy/migration with sybase database – SAP ASE for BS

1697542 – SYB: System copy with target SAP Adaptive Server Enterprise


Usage and Procedure logging (UPL/SCMON) on Solution Manager 7.2

Usage and Procedure logging (UPL) also know as SCMON enables you to monitor you custom code usage and make informed decisions on the same.

You can either enable it either from the managed system directly or from SAP Solution Manager.

On the managed system the data is by default available only for 14 days after which it is overwritten.

Of course this is not enough data when you are looking at long term decision making.

In such case Solution Manager can be used to store the data in BW objects for longer duration.

Below are some points for configuring the UPL with Solution Manager 7.2.

System Preparation, Infrastructure Preparation and Basic Configuration has to be finished successfully.

Among these most import steps are:

1. Solution manager central note is applied in System Preparation

2. Infrastructure Preparation (Set up SAP BW)

3. Basic Configuration (BW Content activation (UPL) under configure basic functions)

It is very important that this step is complete.

4. Managed System Configuration (Maintain RFC’s)

All the required RFC’s (Especially read RFC to the Managed system of required client ) have to be maintained.

5. Custom Code management.

cc1

Steps 1, 2 and 3 are automatic activities and required to be completed successfully.

Under step 3 be careful to select the granularity of the data required while scheduling the house keeping jobs.

Most important steps are 4, 5 and 6 where you select the scope (SID, Client of Managed system) and enable the extractors and jobs to collect data.

If your Managed system setup is completed successfully, the system and client should be available here.

This completes all the actions required to activate UPL on Managed system and collect data on Solution Manager.

Now to verify that UPL is activated successfully, flowing can be done.

On the Managed system:

Execute Program /SDF/SHOW_UPL. This should show you data and available from date (Which is by default 14 days)

If available from data is empty, its time to recheck your configuration.


On Solution Manager:

Check if the extractor framework is is running fine.

SOLMAN_WORKCENTER


Check data in UPL Day DSO (0SM_UPLDD). You should find more than 14 days of data here for your managed system.

Note that from Solution Manager 7.2 SCMON extractor will not be filling the UPL day cube (0SM_UPL).

Important SAP Notes:

2546841 – Custom Code: Usage Logging – SCMON extractor failing with error “Environment key is missing”

2662295 – Benefits of using SCMON in Solution Manager 7.2

2569292 – UPL Data in Usage Cockpit instead of SCMON

2541488 – Poor performance of SCMON extractor ( AGS_CC_SCMON_EXTRACTOR ) in SAP Solution Manager 7.2

2434255 – How To: Stop & Remove UPL/SCMON Data from Solution Manager

2682315 – SCMON collection job ” ABAP Call Monitor: Collect ” is been activated via Solution Manager with no active SCMON data collection configured

2570468 – How to check the SCMON settings for a root flag

2558437 – Data access error: To many Coverage Analyzer job are scheduled on the system * – Error in SCMON extractor

2623917 – Custom Code Management Migration Task 4.2 Fails