I have recently cleared the AWS Certified Solutions Architect – Associate (2018).
Based on my preparation and the exam itself, i have compiled some points as per the index below.

I have recently cleared the AWS Certified Solutions Architect – Associate (2018).
Based on my preparation and the exam itself, i have compiled some points as per the index below.
Virtual private cloud.
You can use a network address translation (NAT) gateway to enable instances in a private subnet to connect to the internet or other AWS services, but prevent the internet from initiating a connection with those instances.
NAT are ideal for instances which need one interntet connection for example patching but no incoming connection from internet.
Bastion hosts (Which are in a public subnet) should be used to connect to the instances in your private subnet.
Other way to connect to server in private subnet is to have a direct VPN connection.
You dont have to
You can extend the disk space online on your AWS Linux VM.
Note down your EC2 instance ID and the block name you want to extend.

User@dbhost:~> df -h
Filesystem Size Used Avail Use% Mounted on
/dev/xvde 300G 17G 283G 6% /Shared
Goto Volumes under your EC2 and search by your Instance ID. This will list all your volumes that are attached to this EC2 instance.

It is recommended to make a snapshot of the volume before extending the size of the volume.
Search the volumes by EC2 instance names

Modify the volume. The size here indicates the total size of the volume and not the volume to be added.


Once you modify the instance the state of volume becomes “In Use – Optimizing”. To complete it might take quite some time based on the size. Wait until the volume becomes green again.

Now your disk volume is ready for extension on Operating System level.
Before extending find the type of file system :
dbhost:~ # lsblk -f
NAME FSTYPE LABEL UUID MOUNTPOINT
hda
`-hda1 ext4 ROOT /
xvdb LVM2_member
|-vggroup-lvdata xfs
Find also the full path of the volume:
dbhost:~ # fdisk -l
Disk /dev/xvde: 300 GiB, 322122547200 bytes, 629145600 sectors
Units: sectors of 1 * 512 = 512 bytes
Sector size (logical/physical): 512 bytes / 512 bytes
I/O size (minimum/optimal): 512 bytes / 512 bytes
Disk /dev/mapper/vggroup-lvdata: 128 GiB, 137443147776 bytes, 268443648 sectors
Units: sectors of 1 * 512 = 512 bytes
Sector size (logical/physical): 512 bytes / 512 bytes
I/O size (minimum/optimal): 262144 bytes / 786432 bytes
Extend the disk space using one of the the below commands based on your file system type:
dbhost:~resize2fs <Volume_Name> #For ext4 file systems
dbhost:~xfs_growfs <Volume_Name> #For xfs file systems
You notice in DBACOCKPIT that you are running out of space on your data/log files of Sybase ASE database.
Below procedure explains the procedure to extend the space on the data/log volume.
Login to dbsql using SA or SAPSA user:
In Sybase data and log files are organize in the form of Devices. Search for the device you should be extending first before allocating the space the data or log file using below command:
use master
sp_helpdb <DBID>
go
Ex: sp_helpdb ERP
In the Result Set 2, you can find the related devices.

Next find the device location using the below command:
use master
sp_helpdevice <data_file_device/log_file_device>
go

Now resize the device using the below command:
use master
disk resize
name = “<device_name>”,
size = “<size>”
go
Now assign the extended device to the database:
For data files:
user master
alter database <DBSID> on <device_name> = <Size>
go
For log file:
use master
alter database <DBSID> log on <device_name> = <Size>
go
With cloud coming into picture, Linux system administration is no more a Linux admins job.
So when you need to create a file system for sapmnt or database you got to know the below at a minimum.
This blog post is about attaching the newly created disks to the Linux environment.
The procedure stands same for AWS, Azure or any cloud environments.
You create a EBS or a Data disk from your cloud portal and assign it to the virtual machine.
Now this is a raw device and is available under /dev.
Login with root privileges to the operating system:
You can view these devices by using the command lsblk:
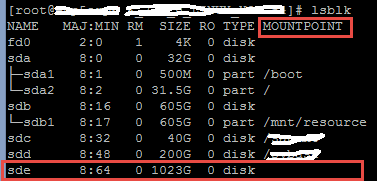
Notice that no mount point is assigned to this newly created disk.
Just to be sure check if the you are using the correct disk volume by using the file command.
![]()
If it returns “data”, it means there is no data on the volume.
Before you mount the volume it is required to format the raw disk according to the requirement. For example ext4 for a linux machine and NTFS for a Windows one:
Ex: mkfs -t ext4 /dev/sde
Now create a directory under “/” which you want to use to mount this volume.
Ex: mkdir /testvolume
Mount the formatted volume on the directory created.
Ex: mount /dev/sde /testvolume
And your file system is now ready for use.
Note: If you want to unmount your file system use below command:
umount /testvolume.
Make sure you are not on /testvolume (volume that is to be unmounted). Otherwise you will get an error that “Volume is in use”.
