Install SSL certificates – STRUSTSSO2

Problem:

You are receiving following error while applying SSL certificate to you SAP Web application server:

CA certificate missing in database (or is not unique) Message no. TRUST057.

Cannot import certificate response.

Steps to Troubleshoot:

  • Verify your certificate request.

You can do this by using any of the CA’s websites. For example Symantec below:

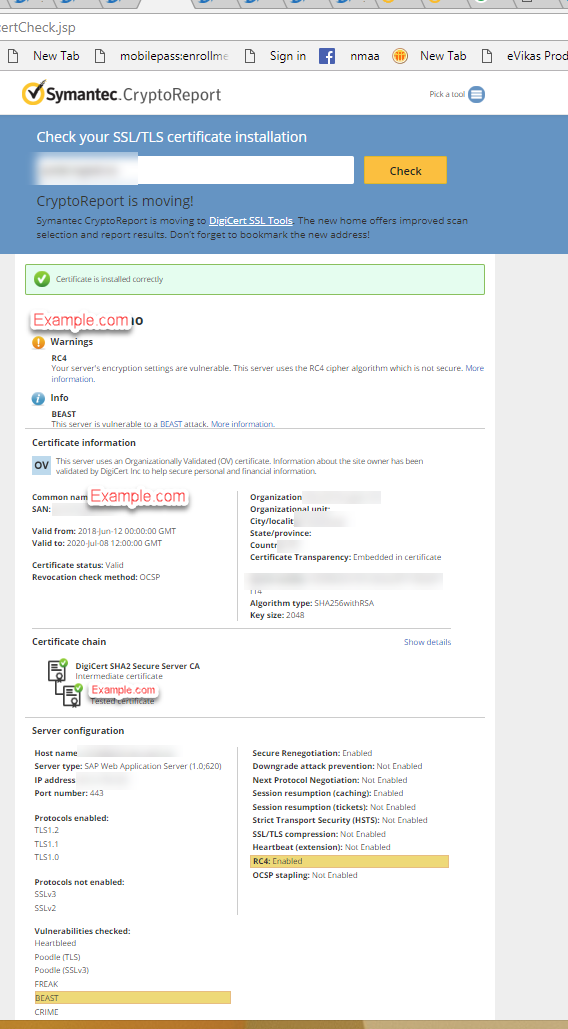
https://cryptoreport.websecurity.symantec.com/checker/views/csrCheck.jsp

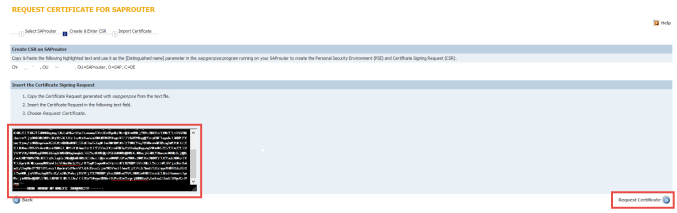
Generate Request from SAP (STRUSTSSO2):

Generate CSR

Paste the CSR into the checker:

CSR check

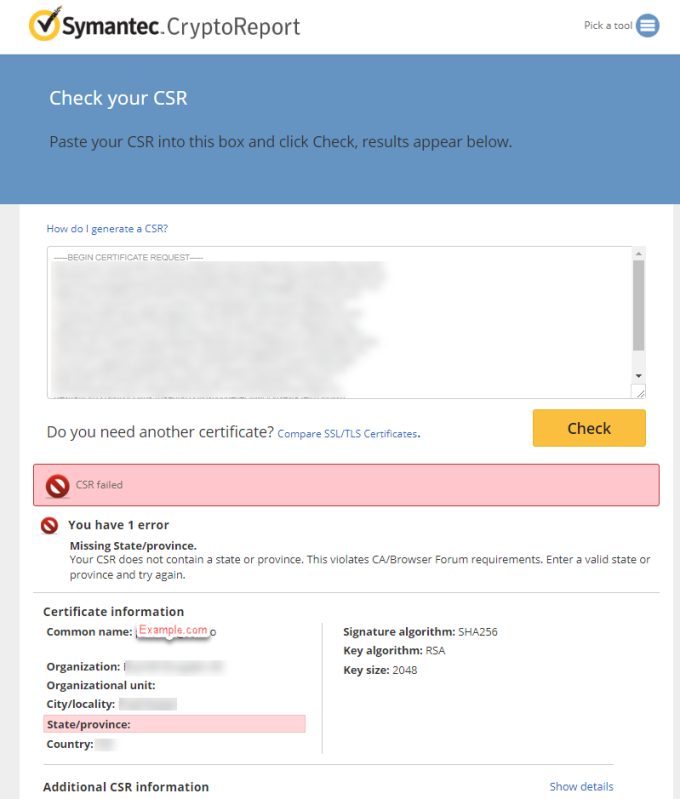
Main thing to check here is the Common Name. This should exactly correspond to the portal url being used by the end users.

In this example certificate will only work if used with portal example.com. It will not work if it is http://www.example.com or media.example.com.

If you are getting any other Common Name then the required one, delete the Server PSE and create new one with correct CN.

Make sure that SSL Server’s own certificate contains CN as the portal name you connect to and the hostname (Unless both are same).

User following guidelines:

  • Country Name (C): Use the two-letter code without punctuation for country, for example: US or CA.
  • State or Province (S): Spell out the state completely; do not abbreviate the state or province name, for example: California
  • Locality or City (L): The Locality field is the city or town name
  • Organization (O): If your company or department has an &, @, or any other symbol using the shift key in its name, you must spell out the symbol or omit it to enroll.
  • Organizational Unit (OU): This field is the name of the department or organization unit making the request.
  • Common Name (CN): The Common Name is the Host + Domain Name. It looks like “www.example.com” or “example.com”
  • Get the right certificate chain

Most of the times, Signed certificates sent by CA will not include the complete chain, i.e. root and intermediate certificates.

These are generic certificates and are not specific to your application.

You can check this by opening the certificate using a notepad.

If you dont have the root and intermediate certificate, you can directly download these from CA’s website.

For example, Symantec certificates can be downloaded with below url:

https://knowledge.digicert.com/generalinformation/INFO4033.html#links

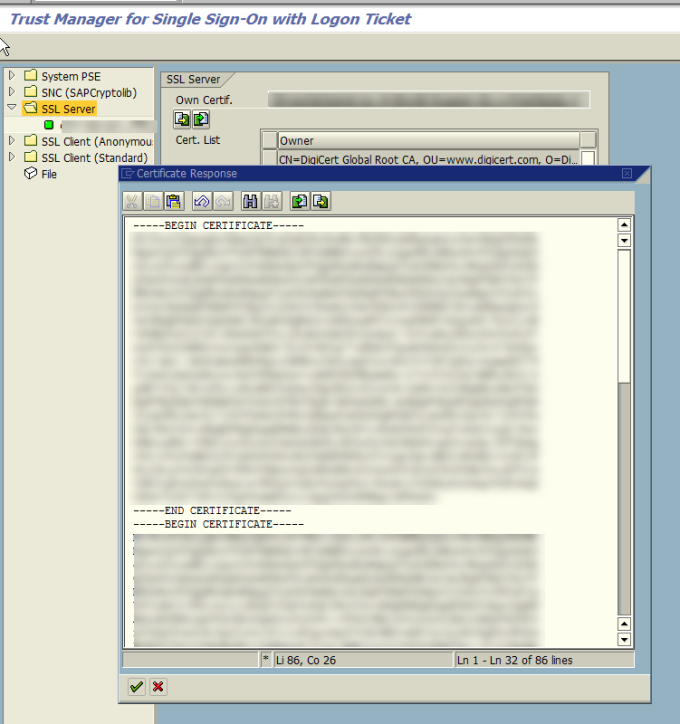
  • Import the certificate into SAP

Now combine all three certificates into one file in any order and save it as a .CER file.

combined cert

Import certificate into SAP. You can either use the file created or just copy paste into the window.

import cert

  • Restart ICM

For these changes to take effect, you must restart your ICM.

restart ICM

  • verify the certificate:

The HTTPS connection can now be verified by using vendor portal or third-party checkers. Symantec is used below:

https://cryptoreport.websecurity.symantec.com/checker/views/certCheck.jsp

verify cert

SAP Router Certificate Refresh

Procedure to refresh your expired SAP Router certificate with new one. I have included some screenshots for better understanding.

Check the validity of your router using below command:

sapgenpse get_my_name

sapgenpse1

Usually the validity of certificate is only for one year.

A. Login to SAP Market Place to get the distinguished name of your router server:

https://support.sap.com/remote-support/saprouter/saprouter-certificates.html

sapgenpse2

Before executing the next steps, make sure that you have taken the backup of complete SAPROUTER folder (Or which ever directory containing your SAP Router). Delete the following files local.pse, srcert, certreq and cred_v2 from SAPROUTER folder.

B. Generate the certificate Request with the command:

sapgenpse get_pse -v -r certreq -p local.pse “<Distinguished Name>”

Example:
sapgenpse get_pse -v -r “E:\usr\sap\saprouter\certreq” -p local.pse “CN=myserver, OU=0000123456, O=saprouter, O=SAP, C=DE”
Got absolute PSE path “E:\usr\sap\saprouter\local.pse”.
Please enter PSE PIN/Passphrase: ****
Please reenter PSE PIN/Passphrase: ****

!!! WARNING: For security reasons it is recommended to use a PIN/passphrase
!!! WARNING: which is at least 8 characters long and contains characters in
!!! WARNING: upper and lower case, numbers and non-alphanumeric symbols.

Supplied distinguished name: “CN=Myserver, OU=0000123456, OU=SAProuter, O=SAP, C=DE”
Creating PSE with format v2 (default)
succeeded.
certificate creation… ok
PSE update… ok
PKRoot… ok
Generating certificate request… ok.
Certificate Request
Signed Part
Subject :CN=Myserver, OU=0000123456, OU=SAProuter, O=SAP, C=DE”
Key
Key type :rsaEncryption 
Key size :2048
Attributes
Signature
Signature algorithm :sha256WithRsaEncryption 
Signature (size=”2048″) :<Not displayed>

You will be asked to enter the pin twice. Do make a note of the pin as you will be using it later.

C. Create SAP Router Certificate:

On SAP Marketpace, select the certificate you want to generate the request for and continue:

sapgenpse3

Copy and paste the content of file “certreq” on the next screen (From begin to end and no space included)

sapgenpse4

Now your SAP Router certificate is ready. Copy the certificate from “Begin certificate” to “End Certificate” and paste the content to file named “srcert”, which must be created in the same directory as the sapgenpse executable.

D. Install the SAP router certificate

Install the certificate using the below command,

sapgenpse import_own_cert -c srcert -p local.pse

example output:

Please enter PIN:
CA-Response successfully imported into PSE “D:\usr\sap\saprouter\local.pse”

E. Create credentials for SAP router 

Execute below command to generate credentials for SAP Router.

sapgenpse seclogin -p local.pse -O <user_for _saprouter>

Example output:

running seclogin with USER=”routadm”
Please enter PIN:
Added SSO-credentials (#0) for PSE “E:\usr\sap\saprouter\local.pse”
“CN=myserver, OU=0000123456, OU=SAProuter, O=SAP, C=DE”

Note: The account of the saprouter user should always be entered in full <domainname>\<username>. If you do not enter a user here, credentials will be generated for currently logged in user.

This will create a file called “cred_v2” in the same directory as “local.pse”

F. Check the certificate.

Execute below command to check the new validity of the certificate:

sapgenpse get_my_name -v -n Issuer
The name of the Issuer should be:
CN=SAProuter CA, OU=SAProuter, O=SAP, C=DE

And below command to check the validity:

sapgenpse get_my_name

Sample output:

SSO for USER “routadm”
with PSE file “E:\usr\sap\saprouter\local.pse”

Subject : CN=myserver, OU=000012345, OU=SAProuter, O=SAP, C=DE
Issuer : CN=SAProuter CA, OU=SAProuter, O=SAP Trust Community II, C=DE
Serialno:
KeyInfo : RSA, 2048-bit
Validity – NotBefore: Fri Mar 010 17:22:45 2017
NotAfter: Thu Mar 08 17:22:45 2018