Drop and recreate Sybase ASE Database

At times it might be necessary to drop and recreate a Sybase ASE database. For example when you want to do a system copy from scratch and you need the current database to be cleaned up or when your DB is in inconsistent state and you want to created new DB and restore it.

Following command can be used to drop a database:

use master

go

drop database <dbname>

But if the DB is in inconsistent state you might get below error:

aseerror2

In such case use the below steps to drop the DB and create it again:

Note: DBCC DROPDB will only work if the database is marked as suspect:

First check if the DB is marked as suspect:

susp

If the DB is not marked as suspect, this should be marked explicitly:

  1. Allow updatesallupNote: At this stage you need to restart your database services for the changes to take effect.
  2. Set the status of DB to suspect (320)setstat
  3. Drop database using DBCC:dropdb

4.   Dont forget to disable the updates by setting “Allow Updates” to Zero and restart       the  database.

SAP HANA Memory Usage – What should I really monitor?

With so many memory areas of SAP HANA, What should I really Monitor with respect to Memory usage of HANA database?

Below picture is key in understanding the memory allocation sequence.

hanamemory

You can control the behaviour of total memory allocated to SAP HANA database by using allocation limit parameter (global.ini -> memorymanager -> global_allocation_limit)

Unless you have additional software running on the HANA server or the HANA licensed memory is less than you physical memory, global_allocation_limit need not be set.

Default value is 0 and most of the times this is not set assuming that the server will be only used by HANA database. This means HANA DB can use the complete memory of the server.

globallmt

Memory allocation in HANA Database implements a pool concept. That is, memory is pre-allocated (reserved) from the operating system for performance reasons. By default, the HANA database will allocate up to approximately 90% of the available physical memory.

This will be used for queries that will need additional space at once. This will be RESERVED and not released back to Operating System.

Hence the reserved memory does not indicate any memory issues with the database.

Key figure to be monitored is the active memory usage of the HANA database:

memused

Same has been clarified in below SAP Note:

2081473 – HANA Resident Memory : High Memory Usage

You can monitor the current usage of memory by each tenant by using below query:

SELECT * FROM “SYS_DATABASES”.”M_SERVICE_MEMORY”

tenmem

Total memory usage of the whole database can also be monitored with HANA_MEMORY_OVRVIEW (SAP Note 1969700 ).

memoverview

You can also monitor the history of total memory usage using _SYS_STATISTICS, like example below:

memusedgg

To check if the SAP HANA Memory parameters are set optimally, you can use HANA_Configuration_Parameters_1.00.70+ (SAP Note 1969700).

Important SAP Notes:

1969700 – SQL Statement Collection for SAP HANA

1840954 – Alerts related to HANA memory consumption

2175606 – HANA: How to set allocation limit for tenant databases

2081473 – HANA Resident Memory : High Memory Usage

1999997 – FAQ: SAP HANA Memory

1998599 – How-To: Analyzing high SAP HANA Memory Consumption due to Translation Tables

2222276 – How-To: Activating SAP HANA Memory Fencing

1898317 – How to handle HANA Alert 1: ‘Host physical memory usage’

1813020 – How to generate a runtime dump on SAP HANA

Random issues faced during Business Process Monitoring (BPM) configuration on Solman 7.2

In this blog i will try to note some issues I faced during configuration of Business Process Operations. Issues are peculiar and might not be relevant for everyone.

A. Issue with Solman_setup -> Basic Configuration -> Activation of BW content (For UPL, RCA…)

During this i faced issue activating BW content. Error is as below. No other logs in SLG1 or ST22 in the system.

bw content error

Solution: I had to restore the logical BW system from RSA1 to fix the issue.

RSA1 -> Modeling -> Source System -> BW -> Logical System

Ran activation again from Solman_Setup and everything went fine.

bw content error1

Probable Cause: We did a client copy to create a new client and something went wrong while running BDLS.

B. Issue with Solman_Setup -> Basic BPO Configuration -> Configure Solution Manager -> Configure Automatically

Activity “Activate BW Cubes” runs into error “BW content not activated”

bw content error2

Solution: Activated the related cubes ( 0SM_BPM, 0SM_BPMRH, OSM_BPMRD) manually from RSA1 as suggested by SAP Note 2434326.

bw content error3

C. Business process monitoring tile is not visible in Solman_workcenter.

Follow the below SAP Note:

2338589 – Troubleshooting for Blank Business Process Monitoring workcenter applications in SAP Solution Manager 7.2

  1. Check and ensure that the user profile used has the following roles applied:
    i.    Run transaction SU01 and display the user profile.
    ii.   Navigate to the Roles tab and confirm that the following roles have been applied:
    –  SAP_SMWORK_BPO
    –  SAP_SMWORK_SM_ADMIN
  2. Check and confirm that the necessary UI5 services are active:
    i.    Run transaction SICF.
    ii.   Enter /sap/bc/ui5_ui5 within the service path field and select Execute.
    iii.  Confirm that the following services are active:
    –  sap_bpm_alrep
    –  sap_bpm_hier
    –  sap_bpm_search
  3. Clear the system cache and internet browser cache:
    i.    Complete all steps contained in the following SAP KBA:
    2319491 – How to clean up the cache after applying changes that affect SAP Fiori apps.
    ii.   Delete the browsing history of the workstation’s internet browser.


Important Notes:

2320230 – How to Confirm “Activate BPMon Services” in Solution Manager 7.2’s BPO Configuration

2491759 – Migration for Business Process Monitoring from Solution Manager 7.1 to 7.2


R3trans and hdbuserstore

When you change the password of connecting user of SAP HANA database, same should be updated in the key file of the HDBUSERSTORE on the Application Server.

You should be logged in with <SIDADM> for this procedure.  Take care of this specially if you application server and database are running on same server.

#> hdbuserstore SET DEFAULT <hostname>:3<instance Number>15 <user> <password>

Note: User option -i along with the command if you want to enter the options (mainly password) interactively.

Example:

hdbuserstore SET DEFAULT hanahost:30015 SYSTEM Hana@123

Once updated check the list using the below command.

#> hdbuserstore list

DATA FILE : /home/appadm/.hdb/hanahost/SSFS_HDB.DAT
KEY FILE : /home/appadm/.hdb/hanahost/SSFS_HDB.KEY

KEY DEFAULT
ENV : HANAHOST:30015
USER: SYSTEM

You can now check the connectivity with the DATABASE using R3trans -d.

If R3trans -d reports error, check the connectivity with hdbsql using the key created above.

#> hdbsql -U <KEY>      #Key is “DEFAULT” in our example.

This should connect to the database without any issues.

You might receive error sql code  rcSQL = -10709 in case of connectivity issues. Please check the host name and port again in case of issues.

In case of any issues/questions please leave a comment below. Happy learning.


Important Notes:

2250144 – FAQ: SAP HANA Secure User Store

2563762 – hdbuserstore still using old hostname after updating

2399996 – How-To: Configuring automatic SAP HANA Cleanup with SAP HANACleaner

2653777 – Phyton connection to HANA database using hdbuserstore-key fails

2416706 – Check file permissions for SAP HANA client hdbuserstore on application server

2130496 – Application does not start after takeover-HANA Disaster Recovery


2709350 – How To set a HANA System License via HDBSQL


System Copy – Sybase ASE

It is one of the most simplest system copies i have ever done. Ensure that Source and Target databases are running on the same release.

No need to uninstall the application or perform a rename using SWPM

I have not mentioned the pre and post processing steps as they are common to all databases and it will differ from customer and customer based on their system usage.

Once you have completed the pre-processing , perform the below steps.

I will assume “TRG” as your target database and “SRC” as your source database.

  • Copy the latest full backup file and required transaction backup files to the target server
  • Stop SAP Application on the target server.
  • Login to SQL/ISQL using “sa” or “sapsa” user ID on target server.
  • Drop the target database using below command. This might take few minutes based on database size.

drop database TRG

  • Create database TRG using below command.

create database TRG on TRG_data_001=’398743M’ log on TRG_log_001=’20480M’ for load

Note:

  1. Size used above are depiction only. This should be equal to or more than your source device sizes.
  2. Replace the device names TRG_data_001 and TRG_log_001 with appropriate device names.
  • Now load the created database using the source backup using below command.

load database TRG from “D:\backup\SRC.dmp”

Note: Assuming “D:\backup\SRC.dmp”. This might take some time based on the source backup size.

  • Now load the log backups to perform point in time recovery using below commands.

load transaction TRG from “D:\logbackup\SRC_001.trn”

load transaction TRG from “D:\logbackup\SRC_002.trn”

etc…

  • Bring the restored database online.

Online database TRG.

Now you are all set to start SAP and perform post processing.


Note: Even though i have not mentioned pre and post steps here, do remember to make the rdisp/wp_no_btc to 0 in your profile parameter before starting SAP.


Important Notes:

2542361 – System copy/migration with sybase database – SAP ASE for BS

1697542 – SYB: System copy with target SAP Adaptive Server Enterprise


Automatic SAP Stop/Start on AWS

Amazon Web Services (AWS) is now one of the most widely used cloud services for hosting SAP applications.

So it is highly important for you to switch off these SAP/AWS instances during unused hours to save the cost on unused resources.

I am just referring you to the interesting blogs/articles which will help you achieve this. Credits to the authors for such detailed blogs.


This can be achieved in two steps.

A. Stop/Start application/DB along with operating system stop/start. Use init scripts to do this as explained in the blog SAP/DB auto start/stop. During maintenance (Multiple reboots) you can switch off the script using, chkconfig <scriptname> off.

B. Stop/Start the AWS EC2 instance using Lambda and Cloud watch functions of AWS as explained in the article  AWS auto start/stop and Video blog.

With this the cloud watch will trigger the lambda functions to stop/start the instance. The init script will recognize the stop/start request and start the SAP stop/start process.

Other methods like AWS data Pipeline and Autoscaling cannot be used for the purpose as it will not support clean shutdown of SAP.

We have implemented for our development and quality systems using these blogs and it works like a charm.

Have a question? Use the comment section below.

Important notes about SAP On AWS:

2539097 – SAP Netweaver License on AWS

1656099 – SAP Applications on AWS: Supported DB/OS and AWS EC2 products

2591601 – SAP on AWS: Adaption of your SAP License

2142455 – SAP Replication Server 15.7.1 SP204 version for Amazon AWS Cloud


SAP Router Certificate Refresh

Procedure to refresh your expired SAP Router certificate with new one. I have included some screenshots for better understanding.

Check the validity of your router using below command:

sapgenpse get_my_name

sapgenpse1

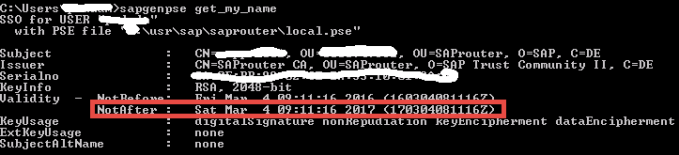
Usually the validity of certificate is only for one year.

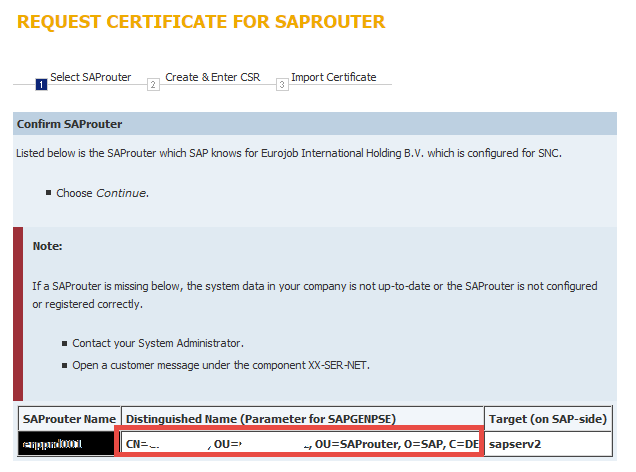
A. Login to SAP Market Place to get the distinguished name of your router server:

https://support.sap.com/remote-support/saprouter/saprouter-certificates.html

sapgenpse2

Before executing the next steps, make sure that you have taken the backup of complete SAPROUTER folder (Or which ever directory containing your SAP Router). Delete the following files local.pse, srcert, certreq and cred_v2 from SAPROUTER folder.

B. Generate the certificate Request with the command:

sapgenpse get_pse -v -r certreq -p local.pse “<Distinguished Name>”

Example:
sapgenpse get_pse -v -r “E:\usr\sap\saprouter\certreq” -p local.pse “CN=myserver, OU=0000123456, O=saprouter, O=SAP, C=DE”
Got absolute PSE path “E:\usr\sap\saprouter\local.pse”.
Please enter PSE PIN/Passphrase: ****
Please reenter PSE PIN/Passphrase: ****

!!! WARNING: For security reasons it is recommended to use a PIN/passphrase
!!! WARNING: which is at least 8 characters long and contains characters in
!!! WARNING: upper and lower case, numbers and non-alphanumeric symbols.

Supplied distinguished name: “CN=Myserver, OU=0000123456, OU=SAProuter, O=SAP, C=DE”
Creating PSE with format v2 (default)
succeeded.
certificate creation… ok
PSE update… ok
PKRoot… ok
Generating certificate request… ok.
Certificate Request
Signed Part
Subject :CN=Myserver, OU=0000123456, OU=SAProuter, O=SAP, C=DE”
Key
Key type :rsaEncryption 
Key size :2048
Attributes
Signature
Signature algorithm :sha256WithRsaEncryption 
Signature (size=”2048″) :<Not displayed>

You will be asked to enter the pin twice. Do make a note of the pin as you will be using it later.

C. Create SAP Router Certificate:

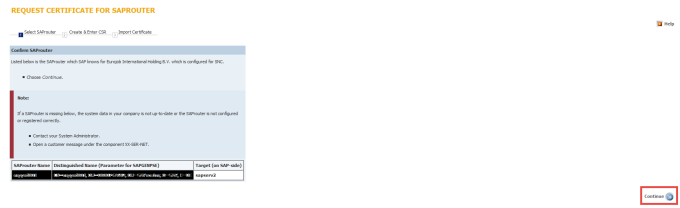
On SAP Marketpace, select the certificate you want to generate the request for and continue:

sapgenpse3

Copy and paste the content of file “certreq” on the next screen (From begin to end and no space included)

sapgenpse4

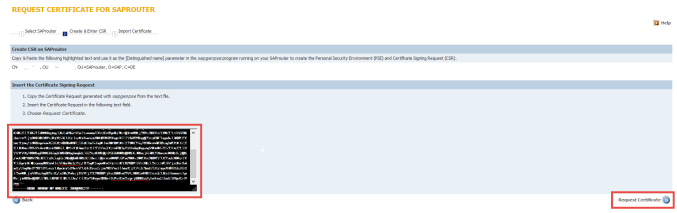
Now your SAP Router certificate is ready. Copy the certificate from “Begin certificate” to “End Certificate” and paste the content to file named “srcert”, which must be created in the same directory as the sapgenpse executable.

D. Install the SAP router certificate

Install the certificate using the below command,

sapgenpse import_own_cert -c srcert -p local.pse

example output:

Please enter PIN:
CA-Response successfully imported into PSE “D:\usr\sap\saprouter\local.pse”

E. Create credentials for SAP router 

Execute below command to generate credentials for SAP Router.

sapgenpse seclogin -p local.pse -O <user_for _saprouter>

Example output:

running seclogin with USER=”routadm”
Please enter PIN:
Added SSO-credentials (#0) for PSE “E:\usr\sap\saprouter\local.pse”
“CN=myserver, OU=0000123456, OU=SAProuter, O=SAP, C=DE”

Note: The account of the saprouter user should always be entered in full <domainname>\<username>. If you do not enter a user here, credentials will be generated for currently logged in user.

This will create a file called “cred_v2” in the same directory as “local.pse”

F. Check the certificate.

Execute below command to check the new validity of the certificate:

sapgenpse get_my_name -v -n Issuer
The name of the Issuer should be:
CN=SAProuter CA, OU=SAProuter, O=SAP, C=DE

And below command to check the validity:

sapgenpse get_my_name

Sample output:

SSO for USER “routadm”
with PSE file “E:\usr\sap\saprouter\local.pse”

Subject : CN=myserver, OU=000012345, OU=SAProuter, O=SAP, C=DE
Issuer : CN=SAProuter CA, OU=SAProuter, O=SAP Trust Community II, C=DE
Serialno:
KeyInfo : RSA, 2048-bit
Validity – NotBefore: Fri Mar 010 17:22:45 2017
NotAfter: Thu Mar 08 17:22:45 2018